How to set up a Reverse Proxy for Webflow using Cloudflare Workers
In this blog post, we will cover how to set up a reverse proxy that can be used to create new routes within your Webflow project. Whilst this isn't an exciting blog post, it does unlock the ability to use Alphi's SSR endpoints with a hosted Webflow project.


Special thanks to Matt from 8020 for being one of the first people to document How to Reverse Proxy a Webflow project with Cloudflare Workers.
What is a Reverse Proxy?
A reverse proxy is a server that sits in front of one or more servers, and acts as a gateway for client requests. When it receives a request it can perform logic, and call external services before returning the response to the client.
When do you need a Reverse Proxy?
Keeping with the context of Webflow, you only really need a reverse proxy if one or more of the following conditions are true:
1. Server-side rendering
Webflow does not provide API access to their server-side renderer. This makes it impossible to create indexable webpages using external CMS providers like Airtable, BaseRow or Ghost.
An example of this is our Hybrid Blog demo. If you're interested in the Alphi setup you can view the Blueprint and Cloneable here.
2. Combine multiple projects under one domain
It's fairly common for large businesses to have multiple Webflow projects split across domains, such as e.g. www.example.com and blog.example.com. Whilst this may seem strange, it makes maintainability across different departments and teams more efficient and modular. The downside to this approach is the SEO impact, as subdomains do not contribute to the primary domain's SEO.
You can use a reverse proxy to serve the blog under the primary domain to get around this, e.g. www.example.com/blog. For more information on this please refer to Matt from 8020's post.
Is this available natively?
Yes, Webflow offers Reverse-Proxy as a service for its enterprise customers. Check out this article or get in touch with their sales team.
Disclaimer
This guide is an educational resource. We advise caution if you intend to use it in production, especially client sites that you do not actively maintain. If you would like to book a consultation to discuss reverse proxies in more depth, feel free to contact us.
Prerequisites
This guide is for those looking to set up a reverse proxy that can be used alongside Alphi to create dynamic pages with an external CMS.
- Connect your domain to Cloudflare
https://developers.cloudflare.com/fundamentals/get-started/setup/add-site/ - Webflow project (paid account)
- Mirror the below project structure
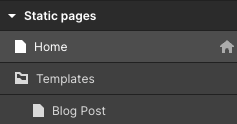
For this example, we will create a new Cloudflare Worker, which displays the Blog Post template page when a user navigates to /blog/<slug>.
In the next blog post, we will cover server-side rendering with Alphi and how to use the Blog Post template to create dynamic webpages using external CMS data.
Configure Webflow
Out-of-the-box Webflow does not support Cloudflare workers as they cannot provision SSL certificates if the domain is not pointing to them directly.
To resolve this, you can navigate to Project Settings > Publishing > Advanced Publishing Options and disable Enable SSL.

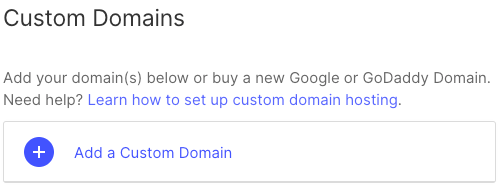
Connect your domain to Webflow
Next, you will need to add your custom domains to Webflow. You can do this by going to Project Settings > Publishing > Custom Domains
You'll need to remove the AAAA record from your DNS settings to ensure your site loads properly.
This error is a result of the AAAA records automatically added by Cloudflare. Don't worry; your site will continue to work properly.
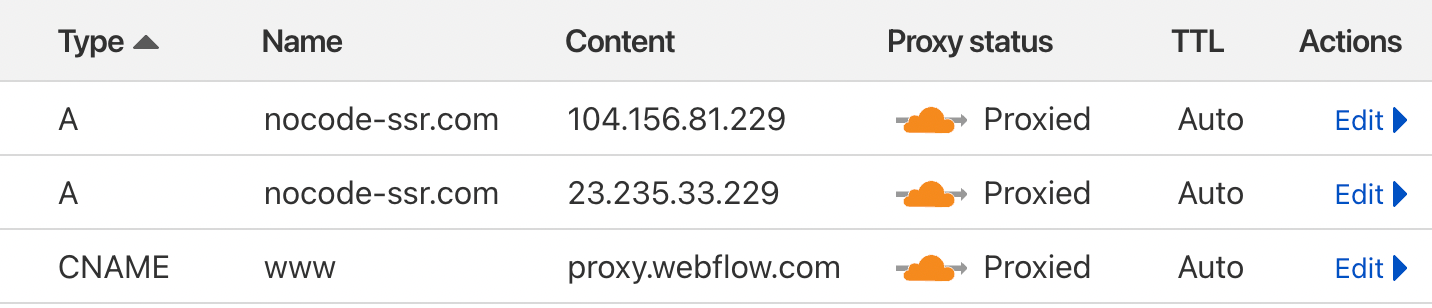
Update you're DNS settings
To update your DNS settings, you must log into your Cloudflare account and add/edit the records indicated by Webflow.
| Type | Name | Value |
|---|---|---|
| A | @ | <webflow_ip_1> |
| A | @ | <webflow_ip_2> |
| CNAME | www | proxy.webflow.com |
| TXT | @ | proxy.webflow.com |
Create a Cloudflare Worker
Cloudflare Workers provides a serverless execution environment that allows you to create entirely new applications or augment existing ones without configuring or maintaining infrastructure.
- Navigate to Workers
- Click Create a Service
- Enter the name for your service
- Select HTTP handler
- Select Service Worker Syntax
- Click Save
Update Cloudflare Worker Logic
Click Quick edit to access the code editor.
If you're following along with this example, you can replace the default code snippet with the one included below.
If you're interested in coding your own Workers, check out the examples.
/*
  addEventListener listens for the 'fetch' event
  and calls the provided function with the event object
*/
addEventListener("fetch", (event) => {
	/*
    	event.respondWith tells the service worker what response to
    	provide for this request. In this case, we call the
    	handleRequest function and provide the request object
    	If handleRequest throws an error, we catch it and return
    	a new Response with the error stack and a 500 status code
    */
    event.respondWith(
        handleRequest(event.request).catch(
            (err) => new Response(err.stack, {
                status: 500
            })
        )
    );
});

/*
	templateUrl is the URL of the template to use for rendering the blog post.
    When using SSR you should replace this with your Alphi endpoint.
*/
const templateUrl = "https://www.nocode-ssr.com/templates/blog-post";

/*
	handleRequest is an async function that receives a request object
	and returns a response object. It parses the URL of the request
	and extracts the slug of the blog post to be rendered.
	It then fetches the template URL with the slug as a query parameter
	and returns the response from the server.
*/
async function handleRequest(request) {

    // We create a new URL object from the request URL
    const {
        pathname
    } = new URL(request.url);

    // We split the pathname by '/' and extract the second element
    // which should be the slug of the blog post
    let slug = pathname.split("/")[2]
    console.log(slug)

    // We fetch the template URL with the slug as a query parameter
    const res = await fetch(templateUrl + `?slug=${slug}`);

    // Return the response from the server
    return res
}
Save & Deploy your Worker.
Setup HTTP Routes
Routes allow you to map a URL pattern to a Worker. When a request is made to a URL that matches the pattern, the Worker is run in front of the application server, in our instance Webflow.
1. Click Websites in the side navigation
2. Select your domain (this changes the side navigation)
3. Click Workers Routes
Here you can configure service routes and bypass routes.
For this example you will need to add two routes:
| URL Pattern | Type |
|---|---|
| www.example.com/blog | bypass route |
| www.example.com/blog/* | worker |
Test the Routes
First navigate to your home page and check its working as expected.
Next, navigate to example.com/blog/test you should be presented with the Blog Post page.
1. Double check the DNS records (A & CNAME) are being proxied
2. Double check the Worker's script to ensure its correct
Finally when navigating to example.com/blog/ you should receive a 404 error.
Canonical Tag
A canonical tag is a way of telling search engines that a specific URL represents the master copy of a page. It's used to prevent duplicate content issues by telling search engines which version of a page they should index. For example, if you have the same content available on multiple URLs, you can use the canonical tag to specify which URL you want search engines to index. This can help improve your search engine rankings and make it easier for search engines to crawl and index your content.
To add a canonical tag you can add the following code snippet:
<link rel="canonical" href="https://www.example.com/blog/<slug>" />Using Alphi makes it easy to set the slug dynamically using the moustache syntax.
<link rel="canonical" href="https://www.example.com/blog/{{data.slug}}" />This approach can also be used to create dynamic SEO titles, descriptions and og:image values (via the page settings fields).
Conclusion
In this tutorial, we ran through how to set up a reverse proxy for Webflow using Cloudflare's DNS Proxy and Workers. In the next blog post, we will continue where we left off and set up an Alphi endpoint which can...
- Retrieve the URL query parameter we send in the Cloudflare worker
- Query data from a 3rd party CMS using the URL query parameter
- Fetch the Webflow page template
- Render a dynamic webpage by combining the Webflow template and the data returned from the 3rd party CMS.
https://www.alphi.dev/blueprints/alphi/ssr-demo/how-to-generate-a-dynamic-webpage-serverside/
If you're looking for assistance in setting up a reverse proxy with Webflow feel free to contact us for a quote.
